
Help center
We're here to help.
Getting started guides, video tutorials, troubleshooting. Everything you need to make the most of your Oryndo watch. A specific issue? Write to us.
6-step setup
Set up your watch.
Total time: under 5 minutes. Follow the steps in order, it's simpler.
- 1
Charge the watch
Plug in the supplied magnetic cable at least 1 hour before first use. It's normal that the battery is low at delivery.
- 2
Insert the SIM card
The 4G SIM card ships in the box. Insert it in the slot under the back cover. The subscription is already active.
- 3
Verify LTE connection
The signal bars and two small arrows should be visible on the screen. Otherwise, go to the Troubleshooting section below.
- 4
Install the Oryndo app
Download the app from the App Store or Google Play. Scan the QR code on the back of the watch to link it to your account.
- 5
First test
From the app, use "Locate the watch" to verify the position is reported. Send a test voice message to validate audio.
- 6
Restart
Restart the watch once setup is complete to activate all features (audio-video messages, notifications, geofencing).
Video tutorials
Learn by watching.
Video 1
Unboxing and First Charge
Video 2
SIM Card Installation
Video 3
Verify the network connection
Troubleshooting
Three checks before anything.
90% of connection issues are resolved by going through these three steps in order.
- 1
Check network connection
Signal bars and two arrows must be visible on the watch screen. If they're missing, go to the next step.
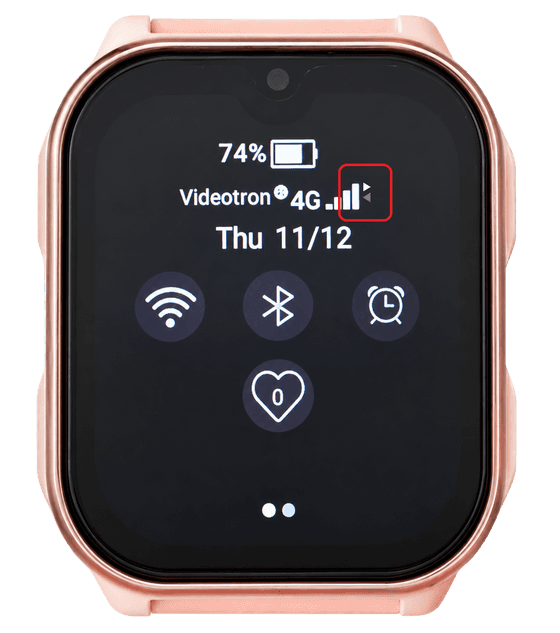
The signal bars and the two small arrows (boxed in red), next to "4G".
- 2
Check roaming
Roaming must be enabled in the watch settings to allow automatic connection to the best network.
- 3
Check APN configuration
APN must be set to "terminal.apn". Go to Settings → Mobile Network → APN. If the issue persists, write to us.
Still stuck?
Our support team, based in Quebec, replies in under 4 business hours, 7 days a week.